Although dormant for the past 9 months, this blog and the associated YouTube channel are still "active". I haven't done much work on the boat since last spring, but there is plenty of footage from last winter and spring awaiting editing. In case I didn't make it clear before, this is a long term project.
As winter has finally arrived, projects around the house and yard, as well as playtime on the MacGregor Venture 25 have slowed. I am awaiting the delivery of the full face respirator I ordered and will soon begin sanding most of the stripped interior. Stay tuned.
Friday, November 18, 2016
Sorry for the hiatus
Wednesday, March 2, 2016
It landed in my ear!
Anyone using power tools, or working with dust or chemicals should always take the necessary safety precautions. I'm not exactly an OSHA poster child, but I try to remember to wear safety goggles and a dust mask and/or respirator when appropriate. But I never imagined the following scenario that could lead someone to wearing burn protection, on their ears.
I was removing deck hardware and had a few stubborn bolts that needed to be cut to be remove. I used my trusty oscillating tool to cut partially through the bolt, then I hit it with a hammer to break it off. One of the red hot bolts, when it broke off, ricocheted off the hull and landed ... in my ear! A quick shake of my head dislodged the micro sized branding iron, but not before it had left its mark.
My that be a lesson to me to always wear protection...no my ears.
Monday, February 29, 2016
Removing the rudder
A few weeks ago I removed the rudder. Like all projects on this boat so far, it was a pain in the ... aft. Removing the rudder head seemed simple enough, loosen the bolts then pull the head off the rudder post.


Not so simple. First I had to spread the clamping part of the head with a slotted screwdriver.

Then I had to use a hammer (not my first choice) to tap the head up and off of the post.


The floor flange for the rudder post was also very snug. I suppose that's the best way to keep water in the cockpit from entering the bilge.


Next was to remove the packing nut.

And the flax packing.

Then outside to the rudder shoe. After towing the boat over 2200 miles last May, I was looking at the rudder and rudder shoe and removed by hand a little, partially threaded nub of a bolt that was resting loose in the rudder shoe. I am amazed that it didn't fall out completely during the road trip. I don't have a picture of the bolt, but in the picture below you can see where it is supposed to go, at the bottom of the rudder.

That bolt, or a larger version of it, is supposed to screw into the bottom of the rudder post, have the head cut off and the neck rests inside the rudder shoe.
The bolts that mount the shoe on the keel were in sad shape. In the picture below, you can barely see what used to be the head of the aft bold that holds the shoe to the keel.

I had to cut off the rest of that head to remove the shoe.


And even then it wasn't easy. I had to drill out one of the other bolts as well.

Then a pair of channel locks and a lot of wiggling, prying and pulling.

And some vise grips to remove the headless bolt.


In theory, the only thing remaining that is holding the rudder in place is the upper pintle assembly. Actually, I'm not sure if it is technically called a pintle, its more like a split bushing.


But I had to fight with that rudder for a long time before I was able to get it free.


Below you can see the signs indicating why a rebuild is necessary.


I just hope I can figure out how to re-install it once I have it rebuilt.
Tuesday, February 23, 2016
Propeller Removal
At purchase, our boat didn't have an
engine, but she did include the prop, drive shaft and coupling.
Since the boat was neglected for so
long, I suspected the cutlass bearing, probably the drive shaft and
certainly the propeller would need to be replaced.
At first I tried mounting a block to
the coupling to prevent the shaft from turning while trying to remove
the prop.
The block approach helped in removing
the prop nut, but corrosion and aquatic growth prevented the prop
from moving at all.
I tried chipping away at the growth and
hammering on the propeller, but to no avail.
I finally decided to simply cut the
prop off the shaft.
Even without the prop, I was having a
difficult time removing the shaft from the bearing.
The next logical step was to remove the
shaft log and cutlass.
That proved almost as challenging. Now
I had to chip away paint along with the aquatic growth and corrosion.
Here is a video showing the process. Enjoy.
Monday, February 8, 2016
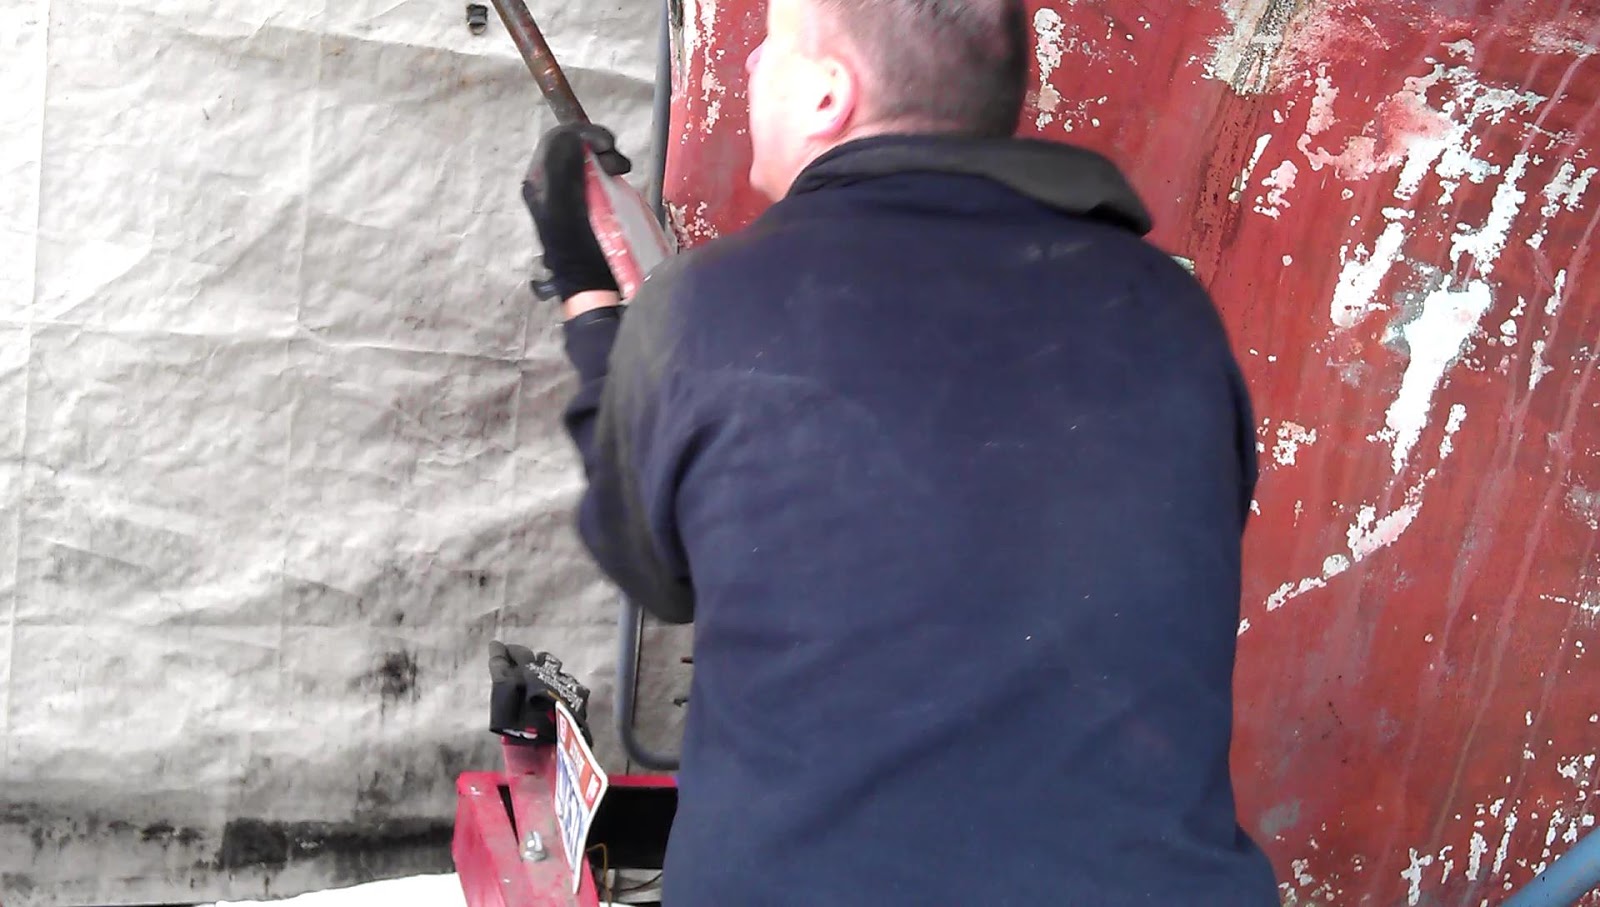
Moving 9000 pounds 18 inches on the trailer.
Recently, I moved the boat aft on the trailer to gain access to the rudder shoe and ultimately to remove the rudder. I did this completely alone and without the aid of buoyancy or the use of a crane.
We bought the boat and trailer separately, so when we picked up the boat, it had to be craned onto the trailer.
With the help of some other Alberg 30 owners, I had figured out the ideal placement of the boat on the trailer for good balance, weight distribution and to allow access to the rudder shoe. However, in the excitement of crane day, combined with being behind schedule, being sick with the flu and being nearly out of time with the crane, I settled for a less than ideal position on the trailer.
Once we got home, I knew I would need to slide the boat aft on the trailer about 18 inches. But how? If it isn't floating or held by a crane, moving a 9000 pound boat isn't easy. But I did it using a come-along and some pieces of Teflon.
Using the screw jacks, I lifted the boat a few inches to gain access under the keel. Then I placed a couple of chunks of Teflon under the keel and lowered the boat.
I looped several slings around the bow and attached some ratchet straps and a come-along.
Using the ratchet straps, the come-along and the screw jacks together, I was able to slide the boat the necessary distance.
I would shift the loose screw jacks forward before re-tightening, then while pulling with the come-along, the jacks would slowly shift aft. Then I would loosen the jacks and repeat the process.
It took a couple of weeks, but once I figured out the process, most of the distance was accomplished in a couple of days.
I probably loosened and re-tightened the screw jacks a hundred times each and circled the boat a few hundred times, but it worked and I am happy with the results.
Once the boat was where I wanted it, I raised it up, removed the Teflon and dropped it back down on the keel support.
Below is a video showing the whole process.
Ahoy and welcome aboard s/v B.
In this episode I'll be moving the boat aft on the trailer to gain access to the rudder shoe and ultimately
to remove the rudder. I do this completely alone and without the aid of buoyancy or the use of a crane.
We bought the boat and trailer separately, so when we picked up the boat, it had to be craned onto the
trailer.
You can watch that video by clicking HERE or on the link in the description below.
With the help of some other Alberg 30 owners, I had figured out the ideal placement of the boat on the
trailer for good balance, weight distribution and to allow access to the rudder shoe. However, in the
excitement of crane day, combined with being behind schedule, being sick with the flu and being nearly
out of time with the crane, I settled for a less than ideal position on the trailer.
Once we got home, I knew I would need to slide the boat aft on the trailer about 18 inches. But how? If
it isn't floating or held by a crane, moving a 9000 pound boat isn't easy. But I did it using a come-along
and some pieces of Teflon.
Using the screw jacks, I lifted the boat a few inches to gain access under the keel. Then I placed a
couple of chunks of Teflon under the keel and lowered the boat.
Sunday, January 31, 2016
Interior clean out
I started this work (and this entry) during the summer, but yard projects, other projects on the boat, work, and following others projects via YouTube etc, all got in the way of completing this entry, or any others since. I'm going to try to get better about posting here and/or on YouTube more regularly. Be sure to check out the other blogs I'm following. Jason of Adventures of Salacia has been a big inspiration.
I spent some time cleaning out the PO's (previous owner's) belongings and garbage. Had the boat not sat for so long, some of this stuff might have been salvaged, but everything was too rotted or moldy, or both.


Subscribe to:
Posts (Atom)